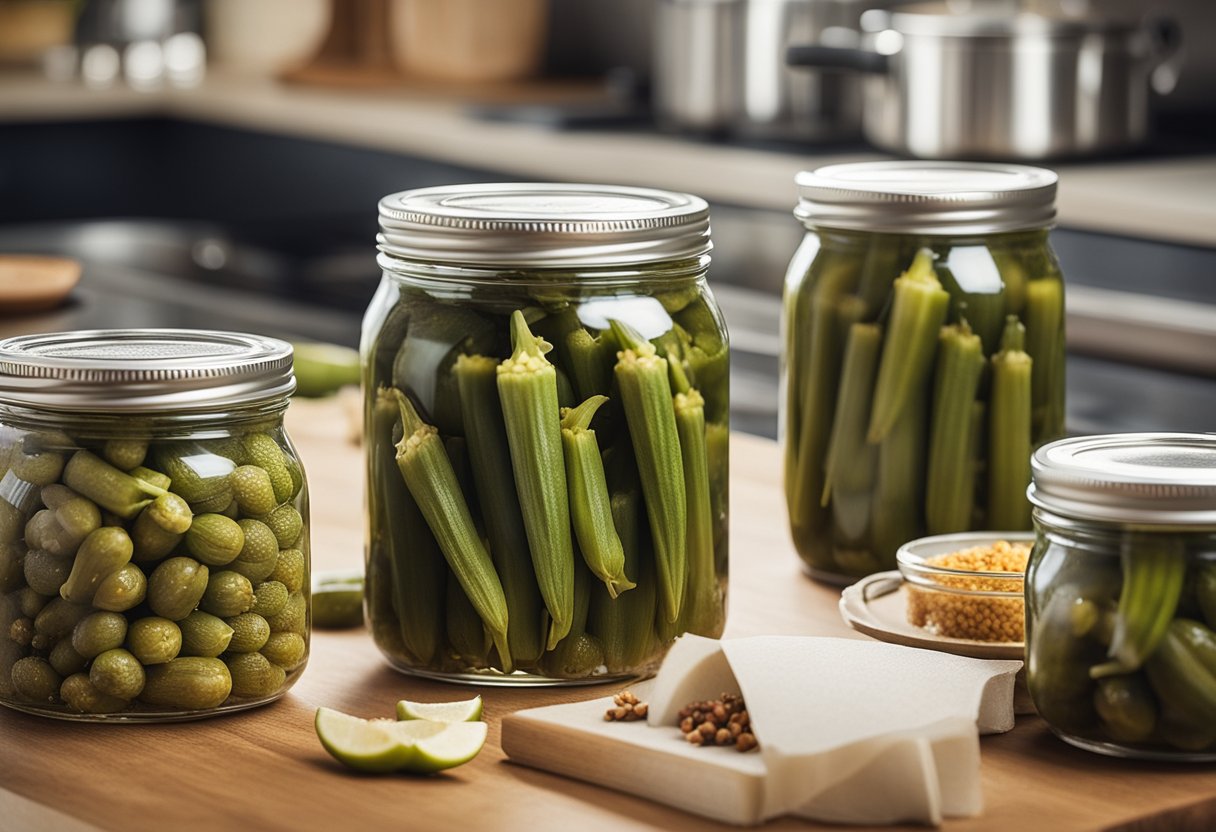
Tangy and Delicious Way to Preserve Okra
If you’re looking for a unique and flavorful snack, pickled okra might just be what you need. This Southern classic is a great way to preserve the flavor of okra, while adding a tangy and slightly spicy kick. Whether you’re looking for a tasty snack or a fun addition to your next party platter, pickled okra is a great choice.

To make pickled okra, you’ll need a few basic ingredients, including fresh okra, vinegar, salt, sugar, and spices. There are many different recipes out there, each with their own unique twist. Some recipes call for garlic, while others use dill or mustard seeds. No matter which recipe you choose, the end result is sure to be delicious.
Pickled okra is a great way to enjoy the flavor of this unique vegetable, and it’s easy to make at home. Whether you’re a fan of traditional Southern cuisine or just looking for a new snack to try, pickled okra is definitely worth a try. So why not give it a shot and see what all the fuss is about?
History of Pickled Okra

Pickling has been a method of preserving food for centuries, and okra has been a popular pickling vegetable in the Southern United States for over 150 years. Okra was brought to America by African slaves in the 17th century and has since become a staple in Southern cuisine.
Pickled okra was first introduced in the late 1800s as a way to preserve the vegetable for year-round consumption. The pickling process involves soaking the okra in a vinegar and spice mixture, which not only preserves the okra but also adds a tangy flavor to it.
Today, pickled okra is a popular snack and condiment in the Southern United States. It is often served alongside other pickled vegetables, such as cucumbers and carrots, and is a staple in Southern-style Bloody Marys.
The recipe for pickled okra has evolved over the years, with variations including spicy pickled okra, garlic pickled okra, and even pickled okra with dill. Some recipes call for boiling the okra before pickling, while others recommend pickling the okra raw.
Overall, pickled okra is a delicious and versatile way to enjoy this Southern favorite year-round.
Health Benefits of Pickled Okra

Pickled okra is a tasty snack that not only satisfies your taste buds but also provides numerous health benefits. Here are some of the health benefits of pickled okra:
Rich in Fiber
Pickled okra is high in fiber, which helps regulate digestion and prevent constipation. According to Momooze.com, one cup of pickled okra contains about 4 grams of dietary fiber, which is about 14% of the recommended daily intake. Fiber also helps you feel full for longer, which can aid in weight management.
Packed with Vitamins and Minerals
Pickled okra is a good source of vitamins and minerals that are essential for maintaining good health. According to The Health Nut Mama, pickled okra is rich in vitamin A, vitamin C, magnesium, calcium, manganese, and iron. Vitamin A and vitamin C are important for maintaining healthy skin, eyes, and immune systems, while magnesium, calcium, manganese, and iron are important for maintaining healthy bones and muscles.
Boosts Immune System
Pickled okra is rich in antioxidants that help protect the body against free radicals and cell damage. According to Momooze.com, one cup of pickled okra contains about 26% of the recommended daily intake of vitamin C, which is an important antioxidant that helps boost the immune system and protect against infections.
Promotes Healthy Digestion
Pickled okra contains high levels of soluble fiber, which helps to regulate bowel movements and promote healthy digestion. According to Power of Greens, the fiber in pickled okra can also help improve gut health by feeding the good bacteria in your gut.
In summary, pickled okra is a delicious and healthy snack that provides numerous health benefits. It is rich in fiber, vitamins, and minerals, and can help boost the immune system, promote healthy digestion, and improve overall health.
Essential Ingredients

When it comes to making the perfect pickled okra, there are a few essential ingredients that you’ll need to have on hand. These ingredients include okra, vinegar, and spices and seasonings to add flavor and depth to your pickles.
Okra Selection
The first step in making pickled okra is selecting the right okra. Look for fresh, firm okra that is free from blemishes or soft spots. The size of the okra is also important. Small to medium-sized okra pods are best for pickling, as they are more tender and have a better texture when pickled.
Vinegar Types
Vinegar is a key ingredient in any pickled okra recipe. There are many different types of vinegar that can be used, including white vinegar, apple cider vinegar, and rice vinegar. White vinegar is the most commonly used vinegar in pickling, as it has a mild flavor that won’t overpower the other ingredients. Apple cider vinegar is a good choice if you want a slightly sweeter flavor, while rice vinegar is a good option if you want a more mild and delicate flavor.
Spices and Seasonings
Adding spices and seasonings to your pickled okra can help to enhance the flavor and add depth to the pickles. Some common spices and seasonings used in pickling include garlic, dill, mustard seeds, and black peppercorns. You can also experiment with other spices and seasonings to create your own unique flavor profile. Just be sure to use fresh, high-quality spices for the best results.
By selecting the right okra, vinegar, and spices and seasonings, you can create a delicious and flavorful batch of pickled okra that is sure to impress.
Equipment Needed

When making pickled okra, you will need a few essential pieces of equipment. Here are the three subsections of equipment that you’ll need:
Jars and Lids
Firstly, you’ll need jars and lids to store your pickled okra. It’s important to use jars that are specifically designed for canning, as they are heat-resistant and can withstand the high temperatures required for canning. Mason jars are a popular choice for canning pickled okra, and they come in a variety of sizes.
You’ll also need lids that are designed for canning. Two-piece lids are the most common type of canning lid, and they consist of a flat metal lid with a sealing compound and a metal screw band. The sealing compound creates an airtight seal that keeps the pickled okra fresh.
Canning Tools
In addition to jars and lids, you will need a few canning tools to make the pickling process easier. A canning funnel is a must-have tool, as it helps you transfer the hot pickling liquid into the jars without spilling. A jar lifter is another essential tool, as it allows you to safely remove hot jars from the canning pot.
A bubble remover is also useful for removing any air bubbles that may be trapped in the jar. This tool is typically a plastic or wooden stick with a flat end that you can use to push down on the pickled okra and release any air bubbles.
Cooking Utensils
Finally, you’ll need some cooking utensils to prepare the pickling liquid. A large pot is essential for boiling the brine, and a ladle is useful for transferring the hot liquid into the jars. You’ll also need a cutting board and a sharp knife to prepare the okra, garlic, and other ingredients.
Overall, having the right equipment is crucial for making delicious pickled okra. By using the correct jars, lids, canning tools, and cooking utensils, you can ensure that your pickled okra is safe to eat and stays fresh for a long time.
Preparation Techniques

When it comes to preparing pickled okra, there are a few key techniques that you should keep in mind to ensure that your final product is flavorful, crunchy, and safe to eat. In this section, we’ll outline the steps you should follow to prepare your okra for pickling, as well as the basics of brine preparation and jar sterilization.
Washing and Cutting
Before you start pickling your okra, it’s important to give it a thorough wash to remove any dirt or debris. Rinse the okra under cool running water and use a vegetable brush to scrub away any stubborn dirt. Once your okra is clean, you can trim off the stems and tips using a sharp knife or kitchen shears. Some recipes recommend leaving a small amount of the stem intact to help the okra stay crisp during the pickling process.
Brine Preparation
The brine is a key component of any pickled okra recipe, as it helps to preserve the vegetables and infuse them with flavor. To prepare your brine, you’ll need to combine vinegar, water, salt, and any other seasonings or spices that you’d like to use. Some popular additions include garlic, dill, and red pepper flakes. Bring the brine to a boil in a large pot, then reduce the heat and let it simmer for a few minutes to allow the flavors to meld.
Sterilizing Jars
To ensure that your pickled okra stays safe to eat for as long as possible, it’s important to sterilize your jars before filling them with the okra and brine. You can do this by washing the jars and lids in hot, soapy water, then placing them in a large pot of boiling water for at least 10 minutes. Alternatively, you can run the jars and lids through a dishwasher cycle on the hottest setting. Once your jars are sterilized, you can fill them with the okra and brine, making sure to leave a bit of headspace at the top of each jar to allow for expansion during the pickling process.
Pickling Process

Pickling okra is a simple process that requires a few basic ingredients and some patience. Here are the steps to follow:
Layering Ingredients
Start by cleaning and trimming the okra. Place a layer of fresh dill in the bottom of each mason jar, followed by the okra. Add a few garlic cloves and cayenne pepper pods for extra flavor. Layer the ingredients until the jars are filled to the top.
Pouring the Brine
In a large pot, bring water, vinegar, salt, and sugar to a boil. Stir until the salt and sugar have dissolved. Carefully pour the hot brine over the okra, leaving about half an inch of headspace at the top of each jar. Use a funnel to avoid spills.
Sealing the Jars
Wipe the rims of the jars clean with a damp cloth to ensure a good seal. Place the lids on the jars and screw on the bands until they are tight. Process the jars in a water bath canner for 10-15 minutes, depending on the size of the jars. Remove the jars from the canner and let them cool on a towel. Check the seals after 24 hours to make sure they are tight.
Pickled okra is a delicious and healthy snack that can be enjoyed all year round. The pickling process preserves the okra’s crunchiness and enhances its flavor. With a little bit of effort, you can make your own pickled okra at home and impress your friends and family.
Storage and Preservation

If you have a surplus of okra, pickling it is a great way to preserve it for later use. Here are some tips for storing and preserving your pickled okra.
Cooling and Storing
Once you have finished pickling your okra, it is important to let it cool down before storing it. You can do this by leaving the jars at room temperature for a few hours. Once the jars have cooled down, you can store them in a cool, dry place. It is best to store pickled okra in a dark place, as exposure to light can cause the pickles to become discolored.
Shelf Life
Pickled okra can last for up to a year if stored properly. However, it is important to note that the quality of the pickles may deteriorate over time. To ensure that your pickled okra stays fresh, it is recommended that you consume it within six months of pickling.
To keep track of the shelf life of your pickled okra, it is a good idea to label the jars with the date that you pickled them. This will help you keep track of how long the pickles have been stored, and when they need to be consumed.
| Storage Method | Shelf Life |
|---|---|
| Room temperature | Up to 1 year |
| Refrigerated | Up to 6 months |
By following these tips, you can ensure that your pickled okra stays fresh and delicious for as long as possible.
Serving Suggestions

Once you have pickled okra, you can serve it in various ways. Here are some serving suggestions to help you get started:
Accompaniments
Pickled okra is a versatile ingredient that can be paired with many dishes. It can be served as a side dish with Southern-style meals such as fried chicken, cornbread, and collard greens. You can also add it to a cheese platter or charcuterie board for a tangy and crunchy addition.
Another way to enjoy pickled okra is to use it as a garnish for cocktails. It pairs well with gin and tonic, Bloody Mary, and margarita. You can also chop it up and add it to salsa or guacamole for an extra kick of flavor.
Recipe Variations
While traditional pickled okra is delicious on its own, you can also experiment with different recipe variations to suit your taste. Here are some ideas:
- Spicy Pickled Okra: Add red pepper flakes or cayenne pepper to the pickling liquid for a spicy kick.
- Garlic Pickled Okra: Add garlic cloves to the pickling liquid for a savory flavor.
- Dill Pickled Okra: Add fresh dill to the pickling liquid for a tangy and herbaceous taste.
- Sweet Pickled Okra: Add sugar or honey to the pickling liquid for a sweeter flavor.
You can also try pickling okra with other vegetables such as carrots, cucumbers, and peppers for a colorful and flavorful mix.
Overall, pickled okra is a versatile and tasty ingredient that can be enjoyed in many ways. Experiment with different serving suggestions and recipe variations to find your favorite way to enjoy it.
Troubleshooting Common Issues

Pickling okra is a simple process, but sometimes things can go wrong. Here are some common issues that you may encounter while pickling okra and how to troubleshoot them.
Texture Problems
Problem: The okra is slimy after pickling.
Solution: To prevent slimy okra, blanch the okra before pickling it. Boil the okra for a few minutes and immediately place it in ice water to stop the cooking process. This helps to retain the okra’s natural crispness and prevents it from becoming slimy during pickling. Additionally, you can add a small amount of calcium chloride or pickling lime to the brine to help firm up the okra.
Problem: The okra is too tough after pickling.
Solution: To prevent tough okra, make sure to use young, fresh okra pods. Older okra pods can become tough and fibrous. Also, avoid overcooking the okra during the pickling process. The longer the okra sits in the brine, the more likely it is to become tough.
Flavor Adjustments
Problem: The pickled okra is too sour.
Solution: If the pickled okra is too sour, reduce the amount of vinegar in the brine. You can also add a small amount of sugar to balance out the acidity. Start with a small amount of sugar and adjust to taste.
Problem: The pickled okra is too salty.
Solution: If the pickled okra is too salty, reduce the amount of salt in the brine. You can also dilute the brine with water to reduce the overall saltiness. Start with a small amount of water and adjust to taste.
By following these troubleshooting tips, you can ensure that your pickled okra is delicious and perfectly textured.
Safety Considerations

When it comes to pickling okra, safety considerations are of utmost importance. Follow these guidelines to ensure that your pickled okra is safe to eat:
- Use tested recipes: Creating your own canning procedures and recipes could result in a hazardous product, since the pH of raw okra is above 4.6. Instead, use tested recipes from reputable sources such as the National Center for Home Food Preservation [1] or Southern Living [2].
- Use commercially prepared vinegar: When pickling, use commercially prepared vinegar with 5% acetic acid to be sure to achieve adequate acidification. Do not alter vinegar, food, or water proportions in a recipe, as this can affect the acidity level and safety of the final product.
- Sterilize jars: Before filling jars with pickled okra, sterilize them by boiling them in water for 15 minutes. This will kill any bacteria or microorganisms that could spoil the pickled okra.
- Follow processing times: When processing pickled okra in a water bath canner, be sure to follow the recommended processing times for your altitude. Processing times vary depending on the altitude, so it is important to use a reliable source such as the National Center for Home Food Preservation [1] to determine the correct processing time.
By following these safety considerations, you can ensure that your pickled okra is safe and delicious to eat.
Frequently Asked Questions

What is the process for canning pickled okra?
Canning pickled okra is a great way to preserve the vegetable for a long time. The process involves sterilizing jars, preparing the okra, and boiling a brine. To begin, clean Mason jars, lids, and bands in hot, soapy water. Next, prepare the okra by carefully cleaning the pods and not cutting off the stems. If some pods are larger than others, slice them lengthwise to make them fit the jars without strain. Finally, boil a brine of vinegar, water, salt, sugar, and spices, and carefully ladle the hot liquid over the okra. Seal the jars and process them in a hot water bath.
How can I make a spicy version of pickled okra?
To make a spicy version of pickled okra, add red pepper flakes or dried chilies to the pickling mixture. You can also include pickling spices like mustard seeds and black peppercorns to create a more complex flavor profile.
What are the steps for making refrigerator pickled okra?
Refrigerator pickled okra is a quick and easy way to enjoy the vegetable without the need for canning. To make refrigerator pickled okra, prepare the okra by cleaning the pods and cutting off the stems. Next, mix together vinegar, water, salt, sugar, and spices in a saucepan and bring to a boil. Pour the mixture over the okra in a jar and let it cool before refrigerating. The pickled okra will be ready to eat after a few hours in the refrigerator.
What is the traditional Southern method for pickling okra?
The traditional Southern method for pickling okra involves using a vinegar-based brine with garlic, dill, and other spices. The okra is typically sliced lengthwise and packed into jars before the brine is added. The jars are then processed in a hot water bath to seal them for long-term storage.
How can I create a sweet flavor profile in my pickled okra?
To create a sweet flavor profile in your pickled okra, add sugar or honey to the pickling mixture. You can also include spices like cinnamon or cloves to enhance the sweetness.
What techniques prevent pickled okra from becoming slimy?
Pickled okra can sometimes become slimy, which is caused by the vegetable’s natural mucilage. To prevent this, select young, fresh okra pods and avoid overcooking them. You can also add acidic ingredients like vinegar or lemon juice to the pickling mixture to help counteract the sliminess.
External Links

If you want to learn more about pickled okra recipes, there are a few external links that you might find useful. Here are some of our top picks:
- Taste of Southern: This website offers a detailed recipe for pickled okra that includes step-by-step instructions and photos. They also offer some helpful tips for canning and storing your pickled okra.
- The Kitchn: The Kitchn has a spicy and crunchy pickled okra recipe that includes garlic and chili peppers. They also provide some variations on the recipe, such as using different spices or adding other vegetables to the mix.
- The Pioneer Woman: The Pioneer Woman offers a simple recipe for pickled okra that uses vinegar, water, sugar, and salt. They also suggest adding additional spices and flavor boosters to the jars, such as citrus slices or garlic cloves.
- Pinch me, I’m eating: This website offers an easy refrigerator pickled okra recipe that requires no canning experience. They provide two variations on the recipe: sweet and tangy or hot and smoky. They also offer some helpful tips for storing and serving your pickled okra.
These external links offer a range of pickled okra recipes to suit different tastes and skill levels. Whether you’re a beginner or an experienced cook, you’re sure to find a recipe that works for you. So why not give pickled okra a try? It’s a delicious and healthy snack that’s perfect for any occasion.
More FAQs

How long does it take for pickled okra to be ready to eat?
Pickled okra is ready to eat in about two weeks. It is important to store the jars in a cool, dry place away from direct sunlight. Once opened, the pickled okra can be stored in the refrigerator for up to three months.
How healthy is pickled okra?
Pickled okra is a healthy snack that is low in calories and high in fiber. Okra is also a good source of vitamins C and K, and minerals like calcium and magnesium. However, pickling okra can add sodium to the snack, so it is important to consume in moderation.
What is the best okra to pickle?
The best okra to pickle is fresh, young, and tender okra. Look for okra pods that are about 2-3 inches long and bright green in color. Avoid okra that is too mature or overripe, as it can be tough and fibrous.
How do you pickle okra without it being slimy?
To pickle okra without it being slimy, it is important to blanch the okra before pickling. Blanching involves boiling the okra for a few minutes and then immediately placing it in an ice bath to stop the cooking process. This will help to reduce the sliminess of the okra and ensure that it stays crunchy after pickling.
Conclusion

In conclusion, pickled okra is a delicious and versatile snack that can be enjoyed on its own or used as a garnish for Bloody Marys and other cocktails. It is easy to make at home and can be customized to your tastes by adding different spices and seasonings.
When making pickled okra, it is important to choose fresh, firm pods and to follow a trusted recipe. Some popular recipes include Simply Recipes’ Pickled Okra Recipe, The Kitchn’s Spicy & Crunchy Pickled Okra Recipe, and Paula Deen’s Pickled Okra Recipe.
To make pickled okra, you will need to prepare the pods by trimming the stems and washing them thoroughly. You can then pack them into jars with other ingredients like garlic, dill, and chilies, and cover them with a hot pickling liquid. After letting the jars cool, you can store them in the fridge or process them in a water bath canner for long-term storage.
Pickled okra is a great snack to have on hand for impromptu gatherings or as a quick and easy appetizer. It is also a healthy snack option, as okra is low in calories and high in fiber and other nutrients. So why not try making your own pickled okra today and enjoy this tasty treat all year round?
PrintPickled Okra Recipe

Discover the perfect balance of tanginess and crunch with our Pickled Okra Recipe. This Southern-inspired delicacy transforms fresh okra pods into a zesty and flavorful treat, ideal for adding a punch to salads, sandwiches, or charcuterie boards. The recipe captures the essence of traditional pickling, infusing the okra with a blend of garlic, peppercorns, mustard seeds, and dill, enhanced by the optional kick of dried red chili peppers.
- Prep Time: 20 minutes
- Cook Time: 10 minutes
- Total Time: 30 minutes (plus 1 week for pickling)
- Yield: Approximately 2 pints 1x
- Category: Condiment
- Method: Pickling
- Cuisine: Southern, American
- Diet: Vegan
Ingredients
- 1 pound fresh okra pods
- 2 cups white vinegar
- 2 cups water
- 1/4 cup salt
- 4 cloves garlic, peeled and smashed
- 2 teaspoons whole black peppercorns
- 2 teaspoons mustard seeds
- 2 teaspoons dill seeds
- 2 dried red chili peppers (optional)
- 2 bay leaves
Instructions
- Wash the okra pods thoroughly and trim the stems, ensuring they fit into your chosen jars.
- In a saucepan, combine the white vinegar, water, and salt. Bring to a boil over medium heat, stirring until the salt dissolves.
- In each sterilized jar, place 2 cloves of smashed garlic, 1 teaspoon of black peppercorns, mustard seeds, and dill seeds, 1 dried red chili pepper (if using), and 1 bay leaf.
- Pack the okra pods tightly into the jars, leaving about half an inch of headspace at the top.
- Pour the hot vinegar mixture over the okra pods, ensuring they are completely covered.
- Wipe the jar rims with a clean, damp cloth and seal tightly with lids.
- Allow the jars to cool to room temperature before storing them in the refrigerator.
- Let the pickled okra sit for at least 1 week before enjoying to allow the flavors to develop fully.
Notes
These tangy and crunchy pickled okra pods make a delightful addition to salads, sandwiches, and charcuterie boards. Experiment with different spices and adjust the level of heat by adding more or fewer chili peppers. Enjoy the pickled okra within a few months for optimal taste and texture.
Nutrition
- Serving Size: 1 okra pod
- Calories: Approximately 10 kcal per serving
- Sugar: 0g
- Sodium: 400mg
- Fat: 0g
- Saturated Fat: 0g
- Unsaturated Fat: 0g
- Trans Fat: 0g
- Carbohydrates: 2g
- Fiber: 1g
- Protein: 0g
- Cholesterol: 0mg
Keywords: Pickled Okra Recipe
More You’ll Love :
Join Our Community on Social Media!